I've always be partial to Kustom equipment.
My first "real" keyboard was a Kustom roll & pleated organ.
No longer did I have to crank every knob and pedal to be heard over the drummer.

Van in 1972. Band-Krystal.
Dad felt pity on me and my Magnus combo organ from Woolworth's and broke down and bought this for me used from Harris Music in W. Palm Beach for $600.
I think mainly it was because we had to practice in our living room where I used his Wurlitzer organ. Not a very rock 'n roll organ.
That and mom was getting pissed about the cigarette burns on the coffee table.
But I digress.........
Finding the K250-4 was by chance on Craig's List.
The guy kept lowering the price and it wasn't selling.
It was a 40 mile one way trip to his house on the other side of the valley, so I made the journey.
Climbing the stairs to the second floor I finally see the Kustom for the first time. My heart sort of sank.
It was dirty, torn and looked abused.
As I looked it over, he lowered the price again.
Testing it out with his guitar, it crackled a bit, but all the functions operated well.
I shined a light into the back to see it didn't have the original speakers, and he lowered the price again.
I handed him the cash and we carried it out to my truck and off I sped.
Here's what it looked like before the restoration.

Here's the full size "before" shot: http://i986.photobucket.com/albums/ae341/vandenmike/kustom250.jpg
The vinyl and grille cloth was torn, the polarity switch didn't function and it still had a crackling sound while played.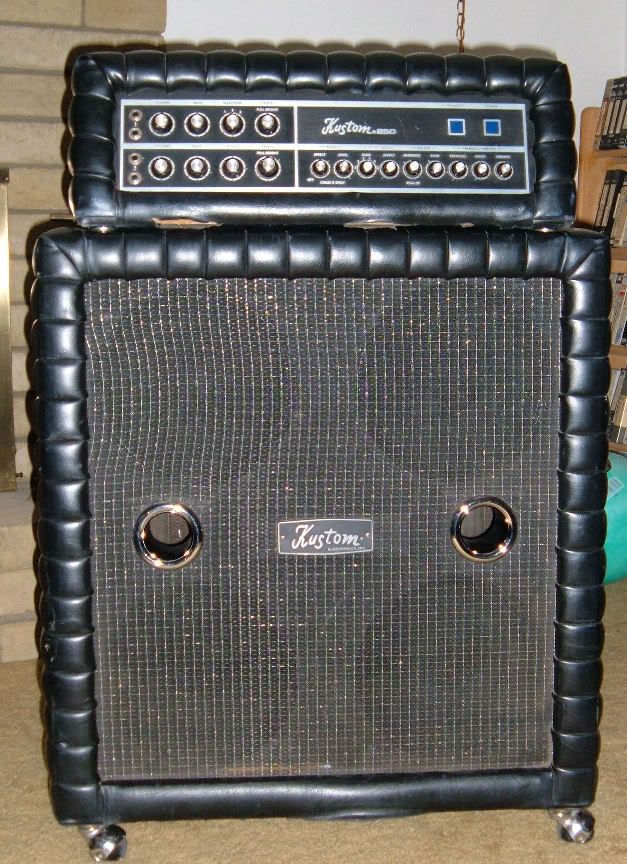
No foot switch or pedal for the tremolo/vibrato, reverb, boost (wah-wah), fuzz came with it, so I knew I'd have to find or reproduce those to get where I wanted.
I was fortunate enough to have the nameplate and handles complete and nice shiny casters. The chrome was 7/10. Very little rust.
The knobs were all original. A big plus.
I had to completely disassemble the head and cabinet to see what was going to be necessary to get this amp as close to original and pretty as possible.
First, the amp head.
Pulling the amp out of it's shell was easy. 4 screws on the bottom and the chassis slid right out. This made repairing the torn vinyl a lot easier.
For the vinyl repair I used the Permatex vinyl repair kit available at most auto parts stores.
I also had to find some vinyl material to use for backing. Found an old black vinyl briefcase at a Saver's store for $2.50. I was able to cut out patches to size out of it and slide them in the holes and splits.
Having a vinyl backing made the vinyl repairs a lot easier. Otherwise I'd be applying vinyl repair to the foam.
I started on the bottom of the head just to get a feel for how the repairs were going to turn out. Didn't want my first try to be somewhere it could be seen in case I muffed it up.
I slid in the backing vinyl (cut a little larger than the hole/split) and secured it with VLP vinyl repair glue. After that dried, on to the Permatex repair kit.
I just filled in the space with a little over-lap, placed the texture material over the liquid vinyl and used the supplied heat iron in the kit.
Turns out that it was easy!. The kit came with a texture material that came close to the original Kustom texture and was barely noticeable. From 2 feet away you couldn't tell it was ever torn.
I spent about a week, 3 hours a day, to get the head to where I was happy with the job.
On to the electronics....
While the vinyl was curing, I went ahead and opened up the amp chassis to check the switch and general condition.
A little dusty, but in overall good condition.
One of the Licon switches was broken.
Of course they haven't made them in 35 years.
Fortunately I found one for sale, used, on eBay.
He was plenty proud of that sucker for $25, but in order to get it to look right, that was the way I had to go.

I also found a loose molex connector for the second channel.
Maybe this is why he kept coming down in price? It was barely connected and might have been cutting in and out.
I found the reverb tank hanging on by one rubber mount.
I fashioned the other mounts by using rubber hose and some threaded rod.
I replaced the electrc cord.
Now, how the heck was I going to get a 4 button foot switch for the on-board effects?
A search of the Internet for an original foot switch was fruitless. Not to be found anywhere.
Fortunately, the guys over at the Vintage Kustom site (http://www.vintagekustom.com/) were a huge help. They gave me a schematic of the original foot switch.
I was able to build a foot switch from generic parts and modify it with LEDs.

I installed a metal one.
The scary part was connecting the foot switch and turning the amp on.
What if I had done it wrong?
I got up the courage and turned it on...it worked!
Every thing functioned correctly. Quite a relief.
Fuzz, tremolo/vibrato, reverb and boost available at a touch of the foot switch. Red LEDs lighting to show they're on.
Now, the boost (wah-wah) pedal.
Searched eBay and the Internet. for a couple weeks.
Finally one showed up on eBay.
It looked like a barn find, or something pulled out of a well.
I saw the bidding going crazy and was out bid. It went for over $100! Screwy!
So once again, the guys over at Vintage Kustom came to my rescue.
All this pedal has in it is a 10k ohm pot.
So, off to the used music shops to find an old volume pedal to convert. That sounds easier than it was. After about a week of searching online and in stores, I came across a used stereo DeArmond pedal sitting in a dusty corner of a used instrument shop.
It was in a box with a lot of "junk".
I pulled it out and showed it to the guy at the counter and he said "$15". SCORE!!
A simple operation. A 10k ohm pot at Radio shack and a stereo cable to connect it to the jack in the back of the amp.

Wiring the wah-wah pedal.

A custom printed label and it looks authentic!
Like I said earlier, this doesn't have the original speakers.
Loaded in the cab are 4 12" Celestion Rocket 50's.
Here's where I found trouble.
The holes in the speakers didn't line up correctly so they had them in cockeyed.
They had also just twisted the wires around the terminals.
It had to be completely disassembled anyway to replace the deformed grille cloth, so everything came out.

There was about 100 staples holding it on to the wood. That took a while.
The deformation on the grille cloth appeared to be from heat. I tried to reheat and stretch the nylon material but got nowhere.
I went online and found Acoustical Solutions. There I found what I thought to be a nice cloth.
The bare wood was filled, sanded and painted.
Then, I correctly measured and drilled the speaker basket outer rim so the screws fit in properly.
Stretching the new grille cloth and re-stapling it was the hard part.
After the cloth was in place, a new weather-proof gasket was applied to the outer edge.
The cabinet vinyl was patched and the innards reinstalled.
Someone had installed a Marshall stereo input on the back of the cabinet.

A DC reading of 3 ohms was read in the mono selection.
The head was capable of a 3-4 ohm connection.
Playing this for 1/2 an hour at moderate volume showed no sign of trouble.
The head had a built-in thermostat in case of overheating, so no worries there.
I liked what I had done and had a 100% working unit, but wasn't extremely happy with the 4 button homemade foot switch.
It looked homemade, and that wasn't going to cut it.
I went to The Guitar Center and happened upon a box of used items.
There I found a used 4 button foot switch. $40.
I was able to resto-mod it like the one I built from scratch.

I ended up putting the first foot switch up on eBay and sold it for what it cost to make.
Sort of disheartening considering the time and effort it took, along with the rarity, but whatcha' gonna' do?

The final product
I ended up selling it on Craig's List. The buyer came in, saw it, plugged in his Les Paul and tried it, then handed me the envelope with the cash. No quibbling or bargaining.
He knew he was getting the rare of the rare. A Kustom K250-4 from 1973/1974 in perfect working order.

Original schematic of foot switch from Kustom.
Ignore my written notes at top.
Ignore my written notes at top.
Awesome. Nice restore. I just purchased a K250-4 and 2x15 matching cabinet. This thing is so unique and has so much vibe it's unbelievable. Do you still have schematics for the Amp head and pedalboard? The Kustom site you reference no longer has these.
ReplyDeleteI actually have all the original pedals pedal board and wah and it all works actually have the k250 4 head and 2 15 head with horn also have the slip covers for the head and cab both all works is in new condition just plugged in and played through it yesterday. My email is elberii@yahoo.com
DeleteHi I am looking for a foot switch schematic for a KUSTOM 150/2
DeleteAny assistance appreciated
spiceroutetours@yahoo.com
Thanks
Nat
Try the fine folks at http://www.vintagekustom.com/
DeleteThanks. I had a lot of fun doing the restoration.
ReplyDeleteThe head had no schematic with it.
If you post on the forum at Vintage Kustom someone may respond with the schematic for you.
I have the foot switch schematic.
Email me and I'll send you a copy.
Van
i have a kustom 200 bass amp that i bought new, now i just bought a kustom k250 guitar amp to hook up with the 200!! is awesome sound!! the k250 has a 15 and a horn. running stereo it shakes the neighborhood! as everyone else i also need the foot switch!! grrrr! did you keep the schematics of the ones you built? i play what i call a four string lead guitar. i have the lightest strings on my bass guitars so this rig combination gets second looks and the sound is definitively noticeable
ReplyDeleteBoth of my lights are out on my K250-4. Is there anything special about replacing the bulbs on this unit? Side note - my unit was the personal amp of the owner of the Seattle Kustom Dealership who used to jam with Buck Owens!
ReplyDeleteI think the lights are 24 volts and can be obtained at meuller electronics in Arlington Texas.. I've purchased two . If you hot me up I'll try to find the part number.
DeleteBj
As I recall, you pry out, gently, the blue plastic cover to get at the bulb.
ReplyDeleteHi Van...Great restore. I have the exact same set up, but all origional, and the same bad power switch. I have the same torn cloth at the bottom of the cab....Looks like its gonna be the hardest part of the restore, except finding the switch......How did you fix such a big tear in the tuck and roll....??? Thanks SWS
ReplyDeletePermatex repair kit and used some vinyl from an old briefcase I found at Savers. Had a nearly perfect pattern to it.
ReplyDeleteTakes practice and patience!
You did an awesome job in the restoration of you Kustom 250. I am in possession of one identical to yours with the exception it is in prime condition. I was there the night it was originally purchased from the music store and I have the original peddles and covers to both the head and speaker cabinet. could you give me an estimate as to its worth?
Delete.
James, thanks for your comment.
DeleteIf yours is completely original, functional and is in prime condition, I'd start asking $1200 and see if you can work with that figure.
Most people will lowball you, ignore them.
I wouldn't take less than $1000.
Thank you Van. That is very helpful. I had no idea where to start.
ReplyDeleteI have a 7 pin 4 switch pedal Boost Reverb Flanger Select, Kustom.What amp does it hook up to?
ReplyDeleteI have the head and original pedal but no cab, I'm trying to figure out what they sell for because I'm thinking of selling it so i can fix my ampeg v4b. Anyone know what a good price on this would be? I don't want to rip anyone off and i don't wannabe taken advantage of either. Thanks for your time to anyone who responds. Oh and it's the dark grey colored one.
ReplyDeleteThis comment has been removed by a blog administrator.
ReplyDeleteHI, where did you get the cable and when you got it working, did the Level on the Fuzz function make the volume louder than when it was off like stomp boxes do?
ReplyDeleteAs I recall, I believe I got the cable at Home Depot.
DeleteI don't remember the volume increasing when the fuzz feature was hit, but it's been a while!
I would like to send a request for the footswitch schematic but can't find your email address.
ReplyDeleteI've added the schematic to the photos for you.
ReplyDeleteWould it be possible for you to publish a higher resolution version of the Kustom footswitch schematic? Would be greatly appreciated!
ReplyDeleteSend me your email address to: mp3aa@hotmail.com and I'll send you a larger picture.
Deletewell done resto, man! and thanks for posting the footswitch schematic, super stoked for the info in this post. thanks brother!
ReplyDeleteMy pleasure!
Delete